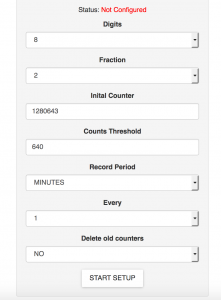
Figure 1 Configuration menu.
Digits – The number of digits in Fraction plus the number of digits for cubical meters (m3). Fraction – The digits between the cubical meters (m3) and dial with the magnet pointer. Initial Counter – The current counter determined by all “Digits“. Has to be entered as a single number, without commas or dots. Counts Threshold – The amount of counters the device to keep in memory prior attempting a transmission. Record Period – The period on which the logger will get the reading of the meter. Could be MINUTES, HOURS, DAYS. Every – The rate of reading in selected “Record Period” units. Delete old counters – In case the meter is reconfigured shall the system keep old counters or not.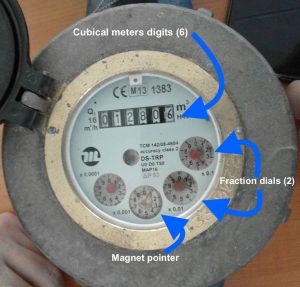 Typical examples are some of the water meters. In order to configure them we have to identify the “magnet pointer” on the screen of the meter.
In order to configure it we have to identify the “magnet pointer” on the screen of the meter. In the example bellow with a water meter the “Magnet pointer” is on X.001 dial.
The two dials before it (X 0.01 and X.0.1) determine the “Fraction” so it is equal to 2.
The cubical meters (m3) digits are 6 so in “Digits” we have 6+2=8.
In this case in “Initial Counter” we have to put 1280643, where 12806 comes from cubical meters, 4 is the measurement of the X 0.1 dial and 3 is the measurement of X.01 dial.
Typical examples are some of the water meters. In order to configure them we have to identify the “magnet pointer” on the screen of the meter.
In order to configure it we have to identify the “magnet pointer” on the screen of the meter. In the example bellow with a water meter the “Magnet pointer” is on X.001 dial.
The two dials before it (X 0.01 and X.0.1) determine the “Fraction” so it is equal to 2.
The cubical meters (m3) digits are 6 so in “Digits” we have 6+2=8.
In this case in “Initial Counter” we have to put 1280643, where 12806 comes from cubical meters, 4 is the measurement of the X 0.1 dial and 3 is the measurement of X.01 dial.
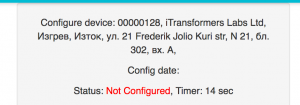 Once you are ready with the configuration values click on “START SETUP” Button and put the device in “Configuration mode”. A timer next to the status will appear and will start ticking.
At that moment you have to touch the device with a strong magnet. It will “wake up” and will try to obtain its configuration from the server.
Once you are ready with the configuration values click on “START SETUP” Button and put the device in “Configuration mode”. A timer next to the status will appear and will start ticking.
At that moment you have to touch the device with a strong magnet. It will “wake up” and will try to obtain its configuration from the server.
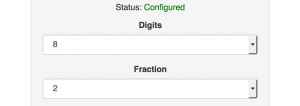 If the server is accessible over the mobile network the device will get its configuration and the status in the Configuration Menu will change in green to “Configured” and the timer will disappear.